DevOps Hands-on Guide: Deploying Serverless Application on AWS with Terraform
When it comes to building a serverless Applications, most of the tutorials will be around building and deploying it using Serverless framework or AWS SAM. In this tutorial, We will see how to build and deploy a Serverless API using Terraform.
Prerequisites
Before we get into the topic, I assume that you have knowledge on DynamoDB and Terraform. If you’re new to all these concepts, i would recommend to go through basics before we get started with the scenario.
Terraform: https://developer.hashicorp.com/terraform/tutorials/aws-get-started/aws-build
DynamoDB: https://docs.aws.amazon.com/amazondynamodb/latest/developerguide/GettingStartedDynamoDB.html
There are various approaches to building serverless applications. You can create a separate Lambda function for each API or wrap the entire application in a single Lambda (also known as a Lambdalith). The choice depends on several factors. For this tutorial, we’ll build a Lambdalith that wraps a Node.js and TypeScript application into a single Lambda function.
Setting up the Application
Let’s skip the basics of setting up a Node.js and TypeScript application and dive straight into integrating DynamoDB with our application.
You can checkout application setup here.
Understanding the DynamoDB Wrapper
The DynamoDBWrapper class is designed to simplify interactions with DynamoDB by encapsulating common operations like getting, putting, updating, deleting, querying, and scanning items. This wrapper utilizes the AWS SDK v3, which provides a modular and efficient way to communicate with AWS services.
Initializing the DynamoDB Client
At its core, the class initializes a DynamoDBClient instance. The constructor configures the client to connect either to a local DynamoDB instance during development or to the AWS service in a production environment, based on the NODE_ENV environment variable.
private docClient: DynamoDBClient;

constructor() {
  this.docClient = new DynamoDBClient({
    endpoint: process.env.NODE_ENV !== "production" ? "http://localhost:8000" : undefined,
    region: "us-east-1",
  });
}
CRUD Operations
The class provides methods for common DynamoDB operations. Each method uses the initialized DynamoDBClient to execute the respective commands and includes error handling to log and throw errors as needed.
Get Item: Fetches a single item from DynamoDB.
async getItem<T>(params: GetItemCommand["input"]): Promise<T | null> {
  try {
    const data = await this.docClient.send(new GetItemCommand(params));
    return (data.Item as T) || null;
  } catch (error) {
    console.error("Error getting item:", error);
    throw new Error("Error getting item");
  }
}
Put Item: Adds a new item to DynamoDB, optionally validating it against a Zod schema before saving.
async putItem<T>(params: PutItemCommand["input"], schema: ZodSchema<T>): Promise<void> {
  try {
    await this.docClient.send(new PutItemCommand(params));
  } catch (error) {
    console.error("Error putting item:", error);
    throw new Error("Error putting item");
  }
}
Update Item: Updates an existing item in DynamoDB.
async updateItem(params: UpdateItemCommand["input"]): Promise<void> {
  try {
    await this.docClient.send(new UpdateItemCommand(params));
  } catch (error) {
    console.error("Error updating item:", error);
    throw new Error("Error updating item");
  }
}
Delete Item: Deletes an item from DynamoDB.
async deleteItem(params: DeleteItemCommand["input"]): Promise<void> {
  try {
    await this.docClient.send(new DeleteItemCommand(params));
  } catch (error) {
    console.error("Error deleting item:", error);
    throw new Error("Error deleting item");
  }
}
Query Items: Retrieves multiple items from DynamoDB that match the query conditions.
async query<T>(params: QueryCommand["input"]): Promise<T[]> {
  try {
    const data = await this.docClient.send(new QueryCommand(params));
    return data.Items as T[];
  } catch (error) {
    console.error("Error querying items:", error);
    throw new Error("Error querying items");
  }
}
Scan Items: Scans the entire DynamoDB table and retrieves all items.
async scan<T>(params: ScanCommand["input"]): Promise<T[]> {
  try {
    const data = await this.docClient.send(new ScanCommand(params));
    return data.Items as T[];
  } catch (error) {
    console.error("Error scanning items:", error);
    throw new Error("Error scanning items");
  }
}
Understanding User Entities and Controller
In user.entities.ts, we define our User data structure and validation rules using Zod. The userSchema ensures that every User has a userId, name, and a valid email. By using z.infer, we create a TypeScript type User that enforces these rules throughout our application, enhancing type safety and preventing errors.
import { z } from 'zod';

export const userSchema = z.object({
  userId: z.string(),
  name: z.string(),
  email: z.string().email(),
});

export type User = z.infer<typeof userSchema>;
In user.controller.ts, we handle the logic for creating and retrieving users. The createUser function checks for existing users by email, generates a unique userId using ulid, validates and converts the payload to a DynamoDB format, and saves it. The getUser and getUserByEmail functions fetch user data by userId and email, respectively. These functions use the DynamoDBWrapper for database interactions, ensuring clean and modular code.
import { DynamoDBWrapper } from '../lib/ddb-wrapper/index';
import { userSchema, User } from './users.entities';
import { ulid } from 'ulidx';
import { PutItemCommandInput } from '@aws-sdk/client-dynamodb'; // Import AttributeValue
import { convertToDynamoDBItem } from './users.helper';

const dynamoDB = new DynamoDBWrapper();

const createUser = async (payload: User) => {
  const existingUser = await getUserByEmail(payload.email);
  if (existingUser) {
    throw new Error('User already exists');
  }

  const id = ulid();
  payload.userId = id;

  const params: PutItemCommandInput = {
    TableName: 'Users',
    Item: convertToDynamoDBItem(payload), // Convert payload to DynamoDB format
  };
  await dynamoDB.putItem(params, userSchema);

  return {
    message: 'User created successfully',
    user: payload,
  };
};

const getUser = async (userId: string) => {
  const params = {
    TableName: 'Users',
    Key: {
      userId: { S: userId }, // Use AttributeValue type
    },
  };
  const user = (await dynamoDB.getItem) < User > params;
  return user;
};

const getUserByEmail = async (email: string) => {
  const params = {
    TableName: 'Users',
    IndexName: 'email-index',
    KeyConditionExpression: 'email = :email',
    ExpressionAttributeValues: {
      ':email': { S: email }, // Use AttributeValue type
    },
  };
  const users = (await dynamoDB.query) < User > params;
  return users.length ? users[0] : null;
};

export { createUser, getUser };
Structuring a Serverless Express Application
When building a serverless Express application, organizing your code effectively is crucial. Here’s how we structure our files for clarity and flexibility:
main.ts
This file serves as the entry point for running the application locally. It imports the Express app from app.ts and starts the server on a specified port. This separation keeps the server initialization clean and straightforward.
import app from './app';

const PORT = process.env.PORT || 3000;

app.listen(PORT, () => {
  console.log(`Server is running on PORT ${PORT}`);
});
app.ts
This file defines the core Express application, setting up middleware, routes, and error handling. By configuring the app separately, we ensure that the same setup can be reused for both local development and serverless deployment.
import express from 'express';
import { Request, Response } from 'express';
import routes from './users/users.route';

const app = express();

app.use(express.json());

app.get('/', async (req: Request, res: Response) => {
  res.send('Hello World');
});

app.use('/user', routes);

app.use((req, res, next) => {
  res.status(404).send();
});

app.use((err, req, res, next) => {
  res.status(err.status || 500).send();
});

export default app;
lambda.ts
This file enables the Express app to run in a serverless environment using the serverless-http library. It wraps the Express app, allowing it to be deployed to AWS Lambda without any changes to the core application logic.
import serverless from 'serverless-http';
import app from './app';

export const handler = serverless(app);
Running the Application Locally
To run this serverless application locally, you’ll need to set up a local DynamoDB instance and a tool to manage it. Here’s how you can do it using dynamodb-admin and Docker.
Setting Up DynamoDB Locally
First, let’s set up DynamoDB locally using Docker. Create a docker-compose.yml file with the following content:
version: "3.7"
services:
  dynamodb-local:
    image: amazon/dynamodb-local:latest
    container_name: dynamodb-local
    ports:
      - "8000:8000"
This docker-compose.yml file does the following:
• Uses Docker Compose Version 3.7: Specifies the version of Docker Compose.
• Defines a Service for DynamoDB Local: Pulls the latest amazon/dynamodb-local image and sets up a container named dynamodb-local.
• Maps Ports: Exposes port 8000 of the container to port 8000 on your local machine, allowing you to interact with DynamoDB Local at http://localhost:8000.
To start DynamoDB Local, run the following command in the directory containing your docker-compose.yml file:
docker-compose up -d
Managing DynamoDB with dynamodb-admin
To easily manage your local DynamoDB instance, you can use dynamodb-admin, a GUI tool. Install it globally using npm:
npm install -g dynamodb-admin
Then, start dynamodb-admin with the following environment variables:
DYNAMO_ENDPOINT=http://localhost:8000 dynamodb-admin
Now, that you have DynamoDB running locally. you can connect with that and build the CRUD APIs.
Configuring Infrastructure for Serverless API Deployment
When provisioning infrastructure for a serverless API using Terraform, there are several strategies to consider. One common approach is to use the archive_file data module in Terraform, which creates a zip file of the Node.js application and references it in the aws_lambda_function resource. However, this approach may not always be the best. Let’s explore why and understand our chosen method.
In case if you’re interested to learn about archive_file deployment strategy. You can find more about the strategy in this article.
Using the archive_file Data Module
The archive_file data module simplifies the process of zipping your application directly within Terraform. Here’s an example configuration:
data "archive_file" "lambda" {
  type        = "zip"
  source_dir  = "${path.module}/../app/build"
  output_path = "${path.module}/../app/terraform-lambda-dynamodb.zip"
}
While this approach is straightforward, it has limitations:
-
Lack of Control: The archive_file module provides limited control over the build process, which can be problematic for complex applications requiring specific build steps.
-
Dependency Management: Handling dependencies and build scripts directly within Terraform can become cumbersome and difficult to manage.
-
Build Consistency: Ensuring a consistent build environment within Terraform might be challenging, especially when dependencies and build tools need to be installed.
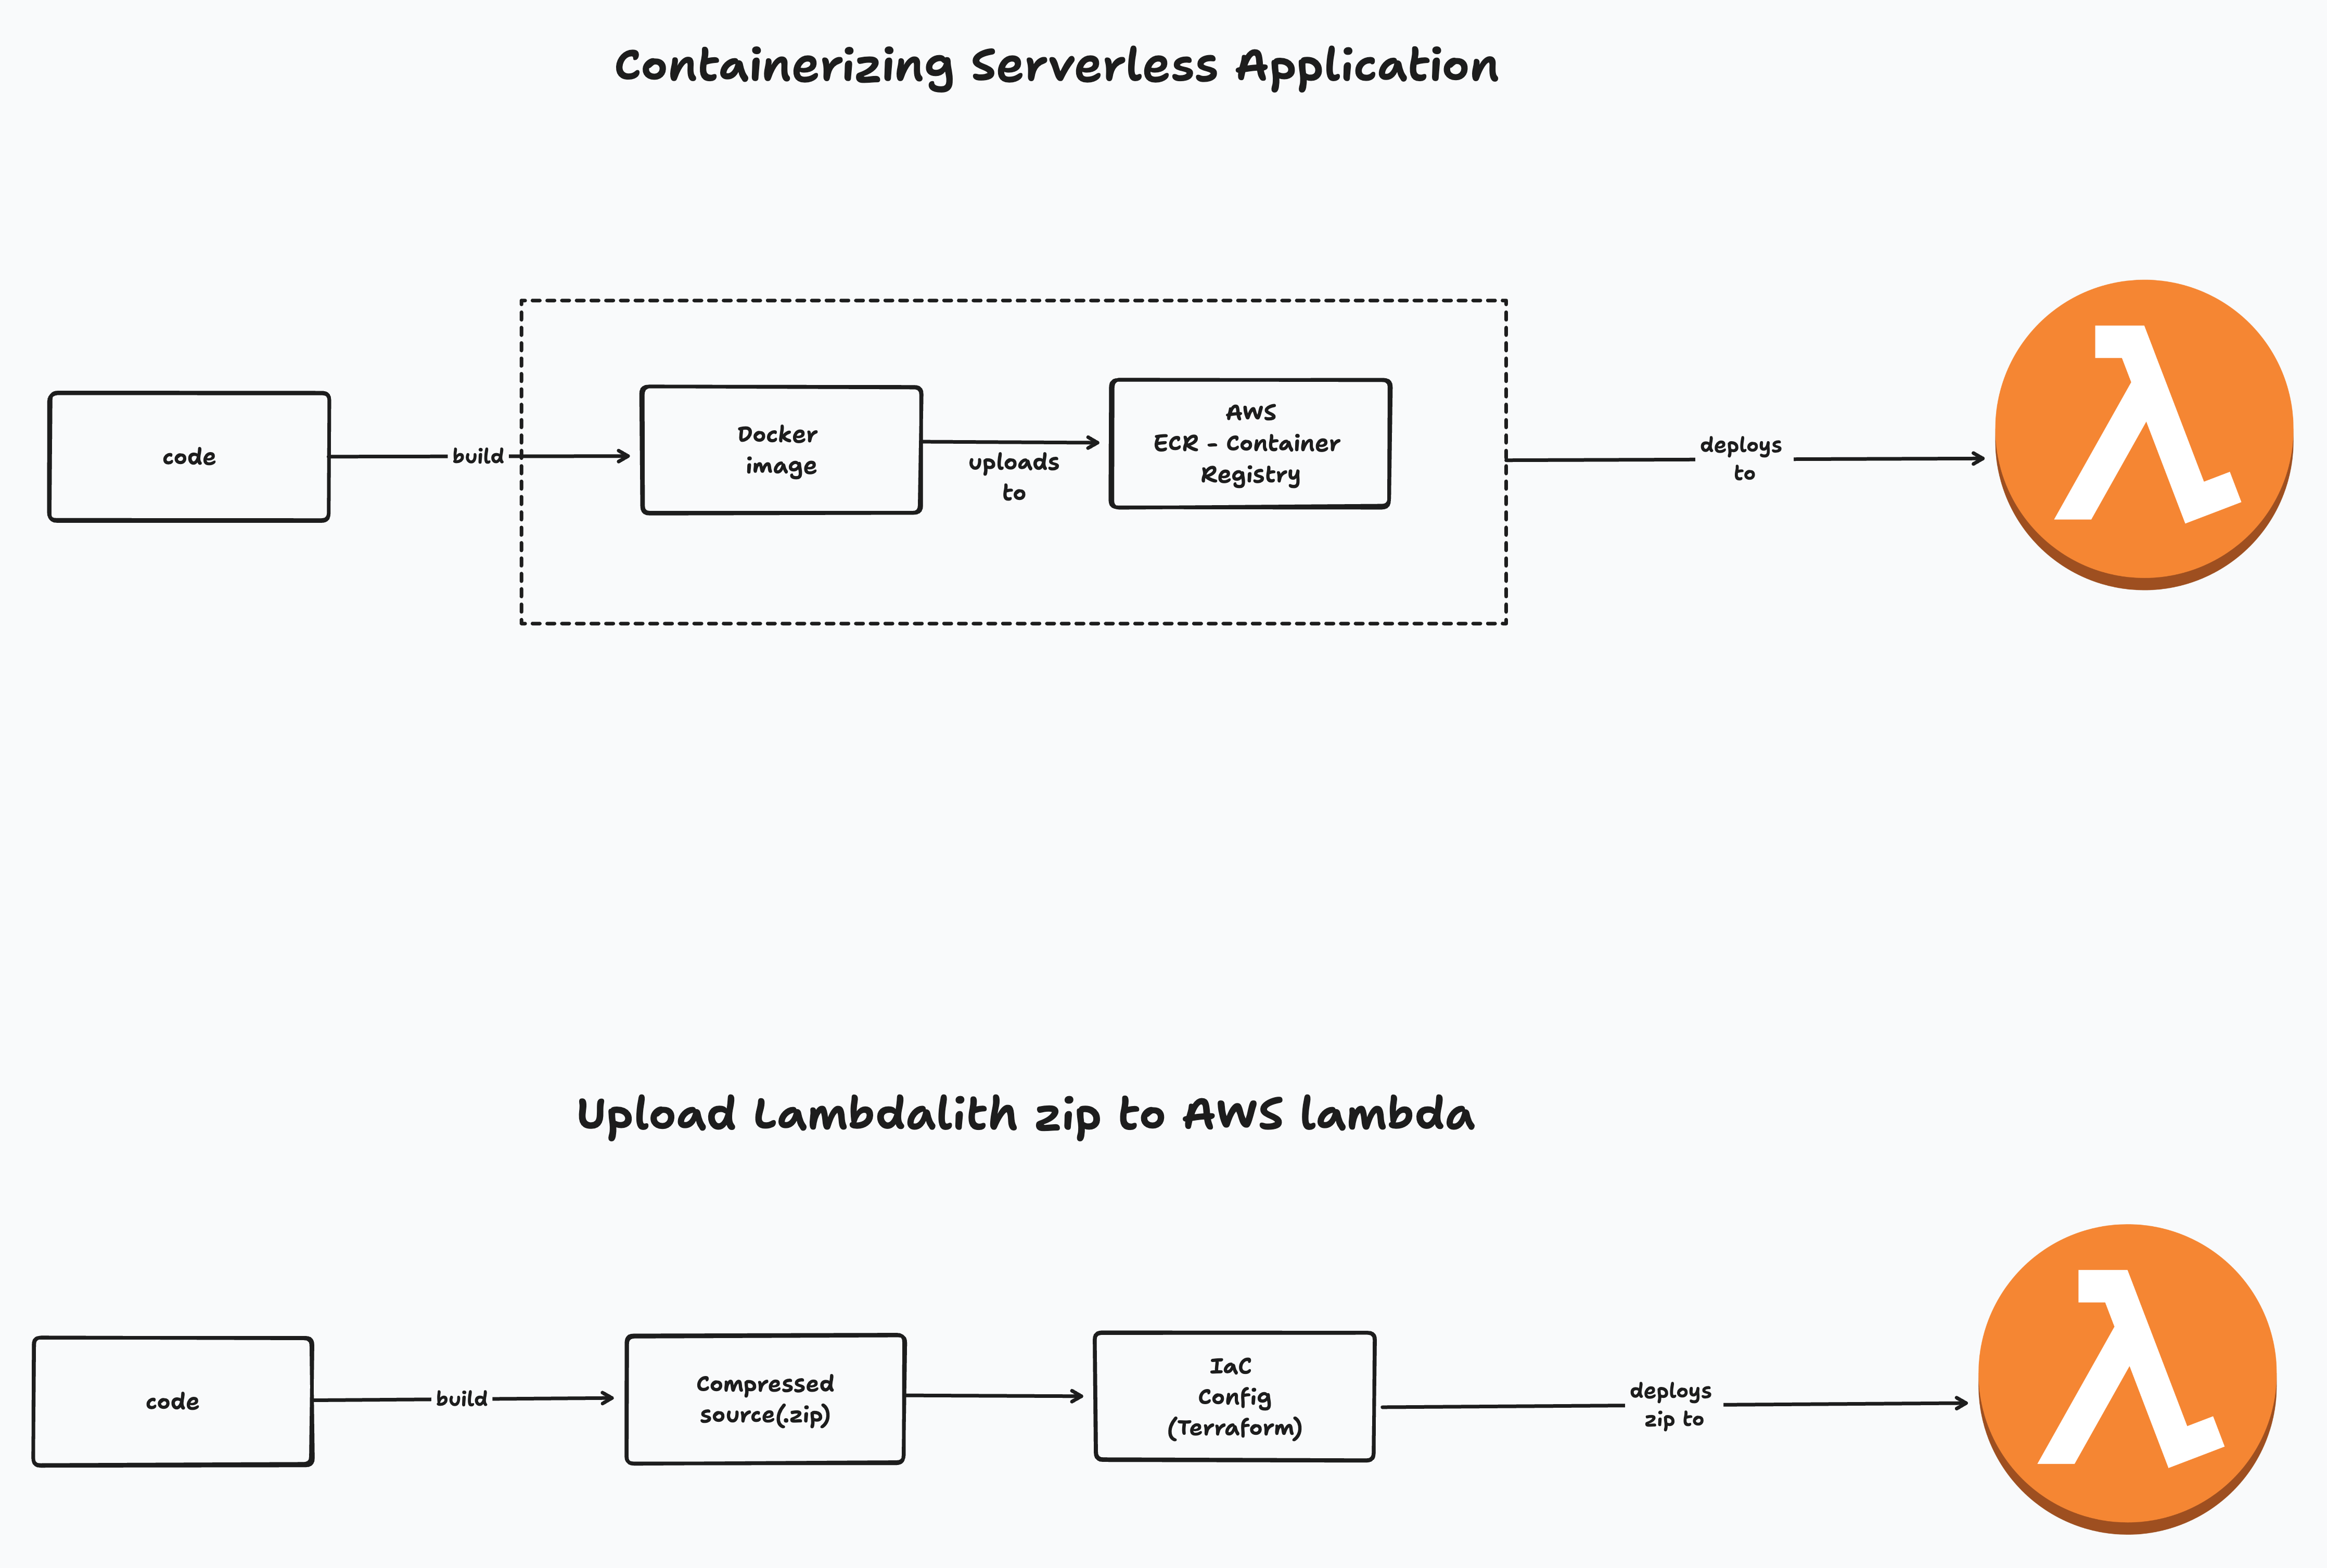
The other two approaches are building docker image, pushing it to AWS ECR and Zipping the Nodejs application and deploying it via CI/CD.
We are opting for the second approach, as it offers several advantages over using containers. One significant benefit is the improved cold start performance for Lambda functions when using zip files instead of containers. Personally, I prefer using zip files due to this performance edge. However, if your application has complex dependencies and is already containerized, it can be easier to port it to Lambda by uploading the container image to ECR and deploying it from there.
Build Script (scripts/bundle.sh): This script prepares the build directory, installs dependencies, and zips the application.
#!/bin/bash

# Exit immediately if a command exits with a non-zero status
set -e

# Get the directory of the current script
SCRIPT_DIR=$(dirname "${BASH_SOURCE[0]}")
BASE_DIR=$(realpath "$SCRIPT_DIR/..")

# Define directories
SRC_DIR="$BASE_DIR/app/src"
APP_DIR="$BASE_DIR/app"
BUILD_DIR="$BASE_DIR/app/build"
PROJECT_DIR_NAME=$(basename "$BASE_DIR")
DIST="${APP_DIR}/tmp/${PROJECT_DIR_NAME}"

echo $BASE_DIR

prepare() {
    if [ -d "$DIST" ]; then
        rm -rf "$DIST"
    fi

    echo "Creating build directory..."
    mkdir -p "$DIST"

    cd "$DIST"
    cp -r "$BUILD_DIR" .

    echo "Copying project manifest..."
    cp $APP_DIR/package.json $APP_DIR/package-lock.json .

    echo "Installing dependencies..."
    npm install --production --ignore-scripts
}

bundle() {
    echo "Creating zip file..."

    if [ ! -d $DIST ]; then
        echo "Build directory does not exist. Run prepare first."
        exit 0
    fi

    local zip_file="$APP_DIR/$PROJECT_DIR_NAME.zip"
    cd $DIST
    echo "Zipping project into $zip_file..."
    zip -r $zip_file .

    echo "Zip file created successfully."
    cd $BASE_DIR

    echo "Cleaning up temporary files..."
    rm -rf "${APP_DIR}/tmp"
}

run() {
    prepare
    bundle
}

if [ $# -gt 0 ] && declare -f "$1" > /dev/null; then
    "$@"
else
    echo "Usage: $0 {prepare|bundle|run}"
    exit 1
fi
Terraform Configuration
Define the IAM Policy Document
First, we need to create an IAM policy document that allows the Lambda function to assume a role. This policy grants the necessary permissions for the Lambda service to interact with AWS resources securely.
data "aws_iam_policy_document" "tf-lambda-dynamodb" {
  statement {
    effect = "Allow"

    principals {
      type = "Service"
      identifiers = ["lambda.amazonaws.com"]
    }

    actions = ["sts:AssumeRole"]
  }
}
Create the IAM Role
Next, we create an IAM role that uses the policy document defined above. This role will be assumed by the Lambda function to gain the necessary permissions to execute.
resource "aws_iam_role" "lambda_role" {
  name = "tf-lambda-dynamodb"
  assume_role_policy = data.aws_iam_policy_document.tf-lambda-dynamodb.json
}
Attach Policies to the IAM Role
We then attach policies to the IAM role to grant permissions for specific DynamoDB and CloudWatch Logs actions. This ensures the Lambda function can perform CRUD operations on DynamoDB and log events.
resource "aws_iam_role_policy" "lambda_role_policy" {
  name = "tf-lambda-dynamodb"
  role = aws_iam_role.lambda_role.name

  policy = <<EOF
{
  "Version": "2012-10-17",
  "Statement": [
    {
      "Effect": "Allow",
      "Action": [
        "dynamodb:PutItem",
        "dynamodb:GetItem",
        "dynamodb:Scan",
        "dynamodb:Query",
        "dynamodb:UpdateItem",
        "dynamodb:DeleteItem",
        "logs:CreateLogGroup",
        "logs:CreateLogStream",
        "logs:PutLogEvents"
      ],
      "Resource": "*"
    }
  ]
}
EOF
}
Define the DynamoDB Table
Now, we define a DynamoDB table named Users with a provisioned billing mode and specified read and write capacities. We set userId as the primary key and create a global secondary index on the email attribute for efficient queries.
resource "aws_dynamodb_table" "tf-lambda-users-ddb" {
  name = "Users"
  billing_mode = "PROVISIONED"
  read_capacity = 20
  write_capacity = 20
  hash_key = "userId"

  attribute {
    name = "userId"
    type = "S"
  }

  attribute {
    name = "email"
    type = "S"
  }

  global_secondary_index {
    name = "email-index"
    hash_key = "email"
    projection_type = "ALL"

    write_capacity = 10
    read_capacity = 10
  }

  tags = {
    Name = "tf-lambda-users-ddb"
  }
}
Configure the Lambda Function
We then configure the Lambda function to use the zip file containing our application code. The function is set to use the nodejs18.x runtime, with a specified handler, timeout, and memory size. Environment variables are also set to configure the runtime environment.
resource "aws_lambda_function" "lambda_fn" {
  filename         = "${path.module}/../app/terraform-lambda-dynamodb.zip"
  function_name    = "tf-lambda-dynamodb"
  role             = aws_iam_role.lambda_role.arn
  handler          = "build/lambda.handler"
  source_code_hash = filebase64sha256("${path.module}/../app/terraform-lambda-dynamodb.zip")
  runtime          = "nodejs18.x"
  timeout          = 15
  memory_size      = 128
  environment {
    variables = {
      NODE_ENV = "production"
    }
  }
}
Create a Public URL for the Lambda Function
Finally, we create a public URL for the Lambda function, making it accessible without any authorization. This is useful for testing and accessing the function directly.
resource "aws_lambda_function_url" "lambda_fn_url" {
  function_name      = aws_lambda_function.lambda_fn.function_name
  authorization_type = "NONE"
}
Applying Terraform Configuration
Once you have all the configuration in place, you can apply the changes using Terraform commands. Start by running terraform init to initialize your working directory and download necessary plugins. Next, use terraform plan to preview the changes Terraform will make to your infrastructure, ensuring everything is set up correctly. Finally, execute terraform apply to apply the configuration.
terraform init
terraform plan
terraform apply
Checkout the complete code here
References
https://aaronstuyvenberg.com/posts/containers-on-lambda
https://rehanvdm.com/blog/should-you-use-a-lambda-monolith-lambdalith-for-the-api